Joe Gore: The Secret Power of Helix Snapshots
by Joe Gore
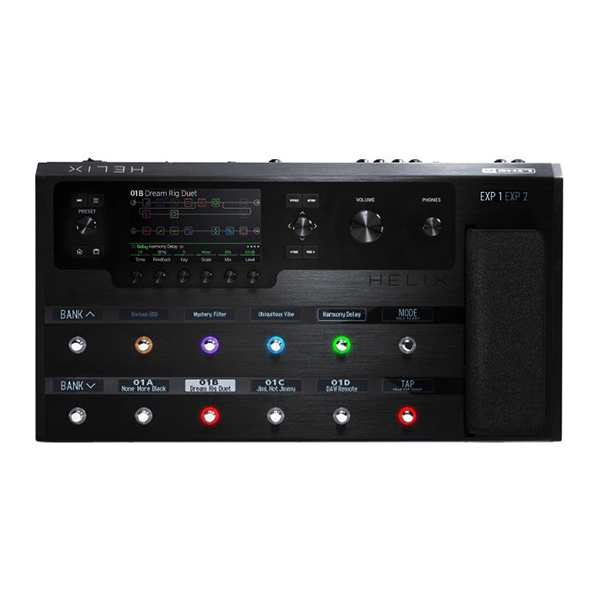
Confession: After getting hooked on Helix, it took me the longest time to appreciate the device’s snapshot functions. “Sounds like a nice feature,” I thought. “Maybe I’ll look into it someday.”
Man, what a dope I was! Cleverly deployed snapshots offer endless sound design possibilities while simplifying live performance.
This article/lesson demonstrates just how powerful, creative, and cool Helix snapshots can be. Start by downloading the Snapshot Presets Pack, which includes four Helix presets: Snap Me 01, Snap Me 02, Snap Me 03, and Snap Me 04.
Snap Me 01 is an unusual preset with no snapshot programming. If you want an intense, hands-on lesson, start with this preset and follow the instructions as we add snapshot functions. Or you can just skim the instructions, and then load the increasingly complex presets as instructed.
Why Bother with Snapshots?
Selecting sounds by choosing snapshots within a single preset, as opposed to switching between separate presets, has several sonic advantages. You can encounter audio gaps when switching presets, but snapshot switching is instantaneous. Also, when you switch snapshots, your delay and reverb tails can continue to sound after switching.
But the greatest advantage, I feel, is how snapshots let you change amp and effect settings throughout a song. We’ll look at two ways to do this. First, we’ll create dramatic block bypass assignments that simply aren’t accessible in Stomp Footswitch Mode. Then we’ll go deeper, creating high-contrast tones by controlling multiple amp and effect parameters simultaneously.
Snapshot Disadvantages?
Every new preset is a blank slate where you can employ any permissible combination of amp and effect blocks, whereas with a set of snapshots you’re restricted to the specific blocks contained in the master preset. However, you have enormous control over each block. You can adjust as many as 64 amp/effect parameters between the eight snapshots within a preset. I often find that creating snapshot sets using a single collection of blocks provides a unifying feel. A set of eight high-contrast sounds can be a great springboard to a new song.
Note that I created these sounds and made screenshots using Line 6’s HX Edit program on a laptop—but you could also do everything from the Helix hardware if you prefer.
Part 1: Snapshot Bypass Programming
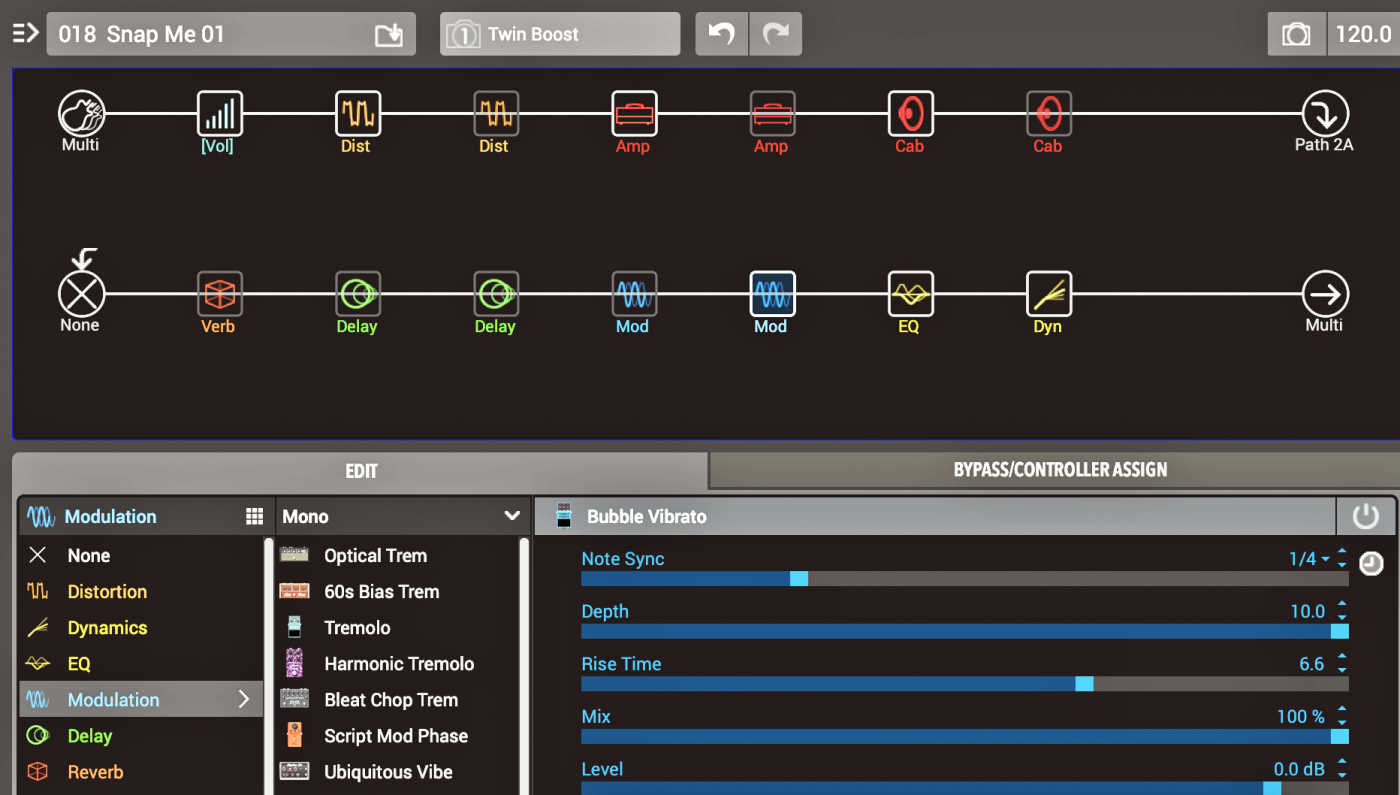
Load our working preset, Snap Me 01, into your Helix. My layout probably looks odd, with two back-to-back distortion pedals, two amps, two cabs, and so on [Image 1]. You’ll see the reason in a moment.

The preset opens to snapshot 1. I’ve bypassed most of the blocks—you hear a nearly dry direct sound when you plug in. Let’s change that. Switch on the first of the two distortion blocks, the first of the two amp blocks, and the first of the two cab blocks [Image 2].

Play, and you’ll hear a simple booster (Kinky Boost) driving a clean-toned combo amp (US Dbl Nrm) feeding a 1×12 cab (1×12 Blue Bell).
Let’s name the snapshot. Choose Rename Snapshot from the Snapshots Menu, or just press Command + Shift + R. I called this snapshot “Twin Boost.” Press Command + S to save the snapshot [Image 3].
Let’s add a second snapshot. Move to the second snapshot slot by selecting Snapshot 2 from the Snapshots menu, or just type Command + 2. (From here on I mostly use key commands because they’re faster than selecting from drop-down menus. They’re worth memorizing.)
Snapshot 2 looks like Snapshot 1 did before we activated any blocks. This time let’s activate the second of the distortion, amp, and cab blocks. This give us an overdriven Marshall sound, complete with 4×12 cabinet. Type Command + Shift + R to rename, type in “Plexi Drive,” and press Command + S to save again [Image 4].

Toggle between these first two presets, either by selecting them in the HX Edit interface. or from the Helix pedalboard. To enter Snapshot mode, press the patch up and patch down footswitches simultaneously. The eight snapshots appear, though we’ve only programmed two so far. Now we have two very different snapshots [Audio 1].
Now let’s make hybrid settings using elements from both virtual rigs. Select Snapshot 3. Leave both distortion blocks bypassed and activate the first amp block and second cab block. Now we have the squeaky-clean tone of a large Fender amp through a Marshall cab. Name this snapshot “Clean” and save it [Image 5].

Now let’s add a filthy fuzz sound as Snapshot 4. We’ll use the same amp/cab combo as in the clean-toned Ex. 3, but with both distortion blocks activated. We could just switch to Snapshot 04 and select the relevant blocks, but instead try the copy and paste commands that we’ll use from here on in.
With Snapshot 3 selected, choose Copy Snapshot from the Snapshots menu, or type Command + Shift + C. Open Snapshot 4 (Command + 4). Select Paste Snapshot from the Snapshots menu (or type Command + Shift + V) to paste the “Clean” snapshot into slot 4. Now activate both distortion pedals, rename the snapshot from “Clean” to “Meltdown,” and save [Image 6].

Now we’ve got high-contrast tones in snapshot slots 1 through 4, as heard in Audio 2. Already, this is something we’d have a hard time replicating in Stomp Footswitch mode. You’d need at least four foot taps to call up these sounds. With snapshots, a single tap does the trick.
Now we’ll integrate some of the bypassed effects from Path 2. Start by duplicating our first four snapshots. Using the methods above, copy Snapshot 1 (Twin Boost) to Snapshot slot 5. Copy Snapshot 2 (Plexi) to Snapshot 6. Copy Snapshot 3 (Clean) to Snapshot 7, and copy Snapshot 4 (Meltdown) to Snapshot 8. You can verify that the snapshots are configured correctly by clicking on the Snapshots menu bar. The pulldown reveals the positions and names of the eight snapshots [Image 7].
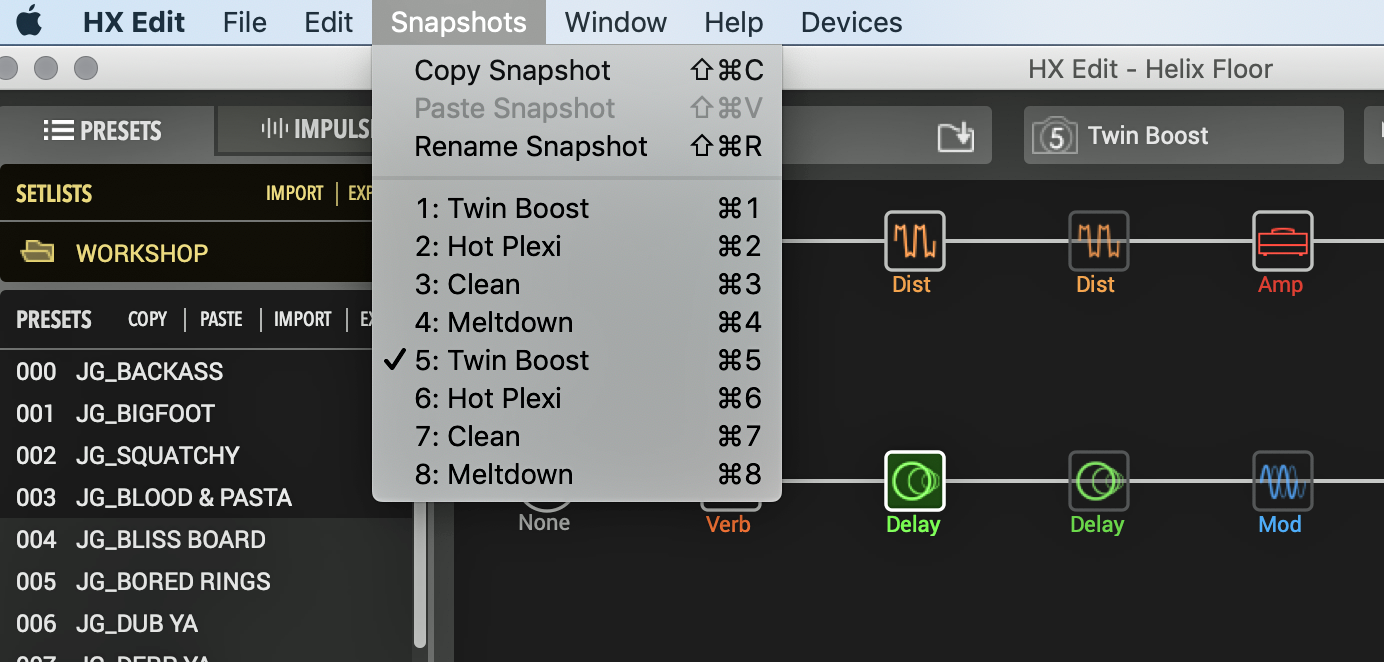
If you didn’t quite follow all of those steps (or didn’t want to) just load the preset Snap Me 02, which includes all our edits up to this point.
Part 2: Snapshot Parameter Programming
Now that we have snapshots 1 through 4 duplicated as snapshots 5 through 8, let’s differentiate them by adding effects. At this point we’ll be doing more than just clicking blocks on and off. We’ll adjust individual parameter settings from snapshot to snapshot.
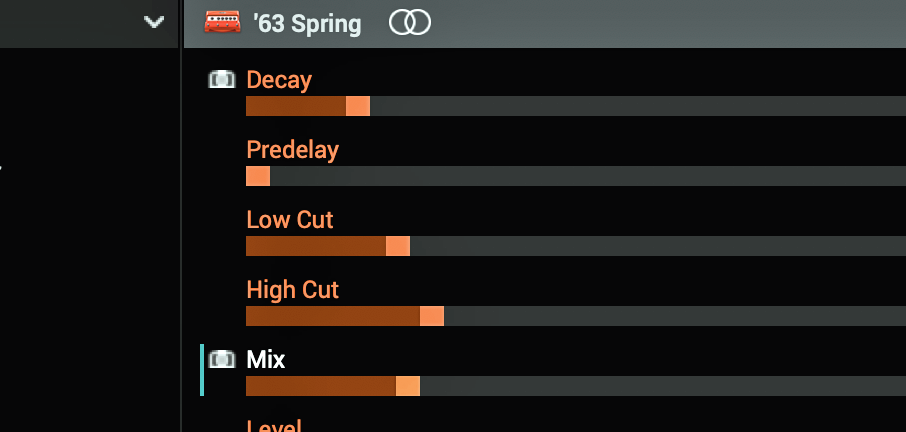
Select Snapshot 5 and click on the ’63 Spring reverb block. This has been on all along, but at a subtle setting, just to add subliminal “air” around the tones. Now let’s crank it for a dramatic Fender spring reverb sound [Image 8].
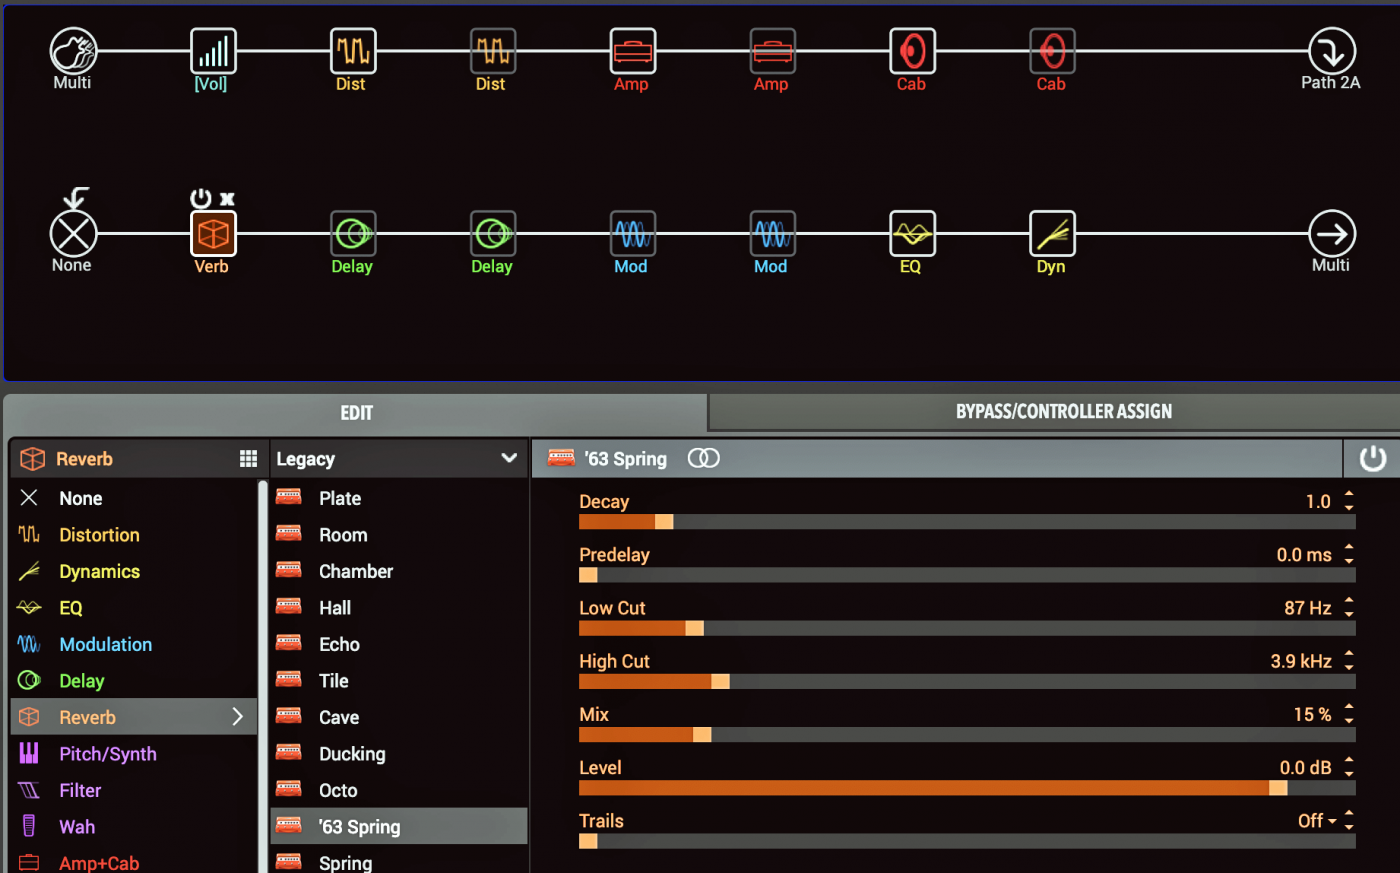
For a wetter sound, we’ll increase both the decay and mix settings. Click/hold on the orange Decay bar and select “snapshots” from the drop-down menu [Image 9]. It’s the last item on the list, so you may need to scroll down to see it.
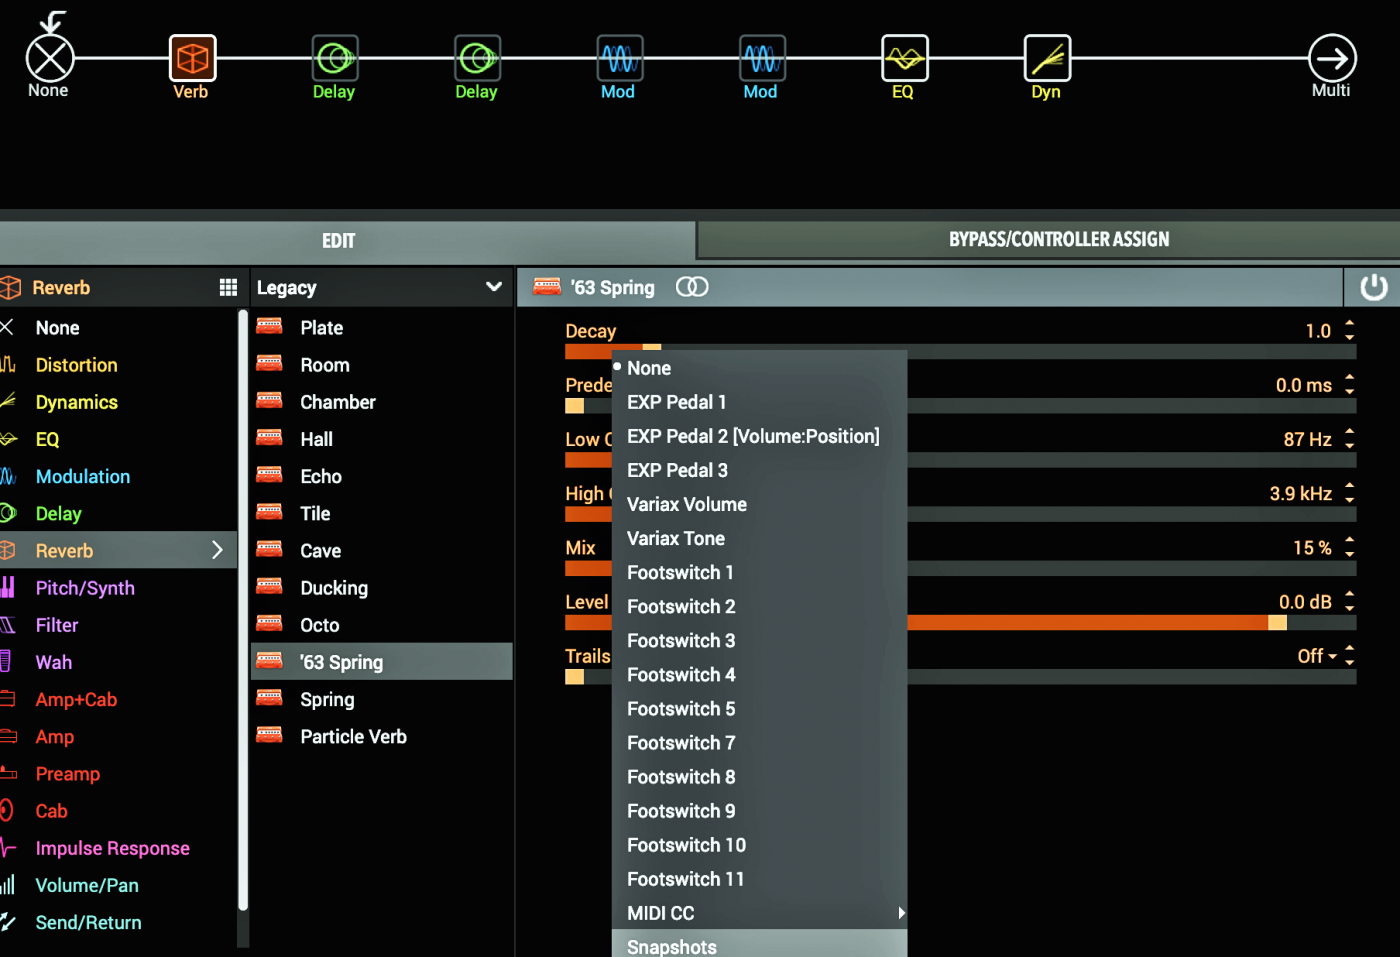
We’ve just informed Helix that anytime we change the Decay setting, its status will be stored with the active snapshot. Advance Decay to 7.00. This change will only apply to Snapshot 5. If you select any other preset, the parameter will revert back to its previous 1.0 value. (Unless you choose and store new values within the snapshot.)
To change the Mix setting for this snapshot only, click/hold on Mix, and select “snapshots” from the drop-down. Raise the mix level to 30%. You should now hear a big, juicy reverb effect. Rename the preset as “Twin Verb” and save. Toggle back and forth between Snapshot 1 and Snapshot 5 and hear the reverb go from light to heavy.
Note that you now have a visual cue that these two parameters are adjustable from snapshot to snapshot: the little camera icon to the left of the parameter name [Image 10]. These icons now appear in all snapshots regardless of the current parameter settings.
Now let’s add tremolo by activating the first of the two modulation blocks, Harmonic Tremolo. You should now hear a dramatic stereo effect. All the blocks in Path 1 (the upper row of blocks) are mono. But all blocks from the reverb onward are stereo.
Additionally, let’s fine-tune the trem effect with more parameter mapping. Assign the following Harmonic Tremolo parameters to Snapshots by click-holding to reveal the pull-down menu: Note Sync, Intensity, Wave Shape, and Spread. The camera icon appears alongside the assigned parameters [Image 11].
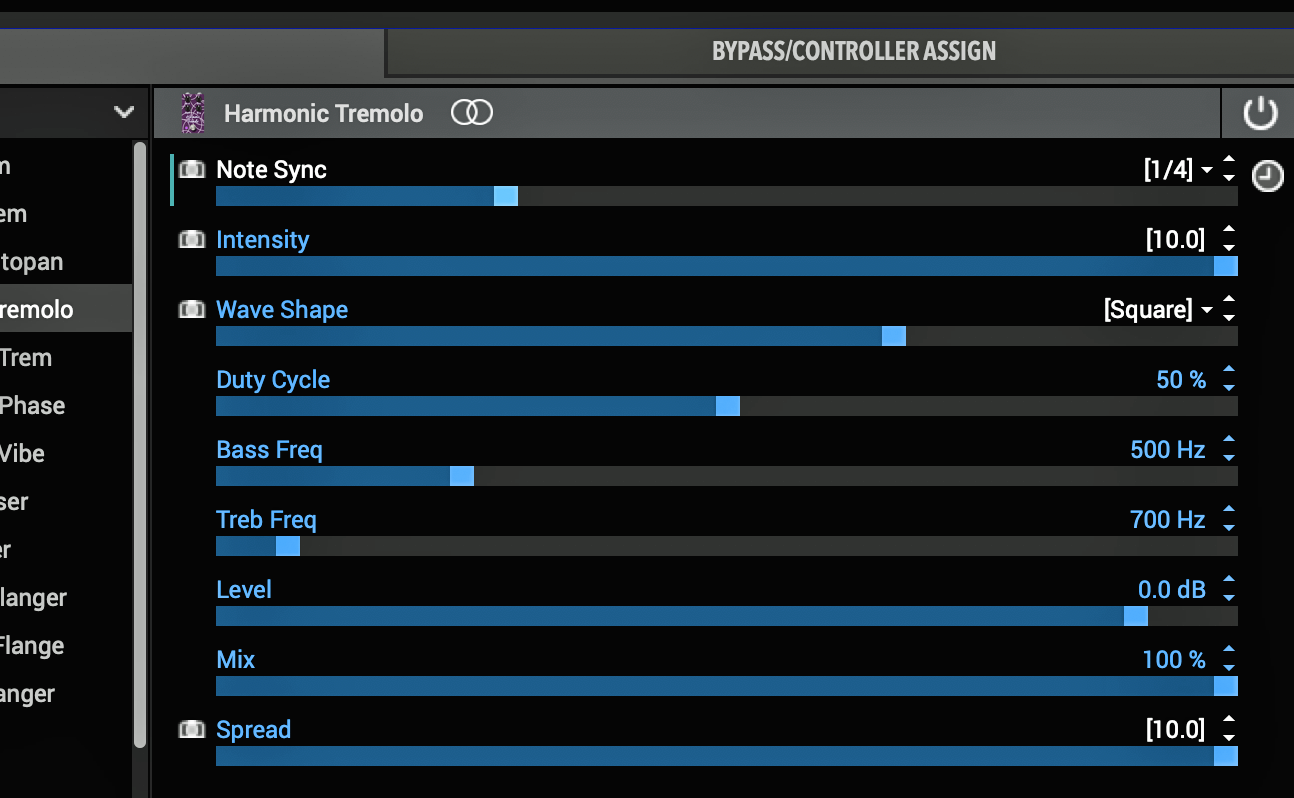
Raise the Note Sync setting from ¼ to 1/8 Triplet for faster pulsation. Lower Intensity to 6.0 for a subtler effect. Change Wave Shape from Sine to Triangle for a classic trem sound. And while the stereo effect is dramatic, maybe it commands too much attention. Let’s lower Spread from 10 to 5. Press save again. Now we’ve got a relatively understated trem effect, as heard in Audio 3. Again, the changes we made only apply to Snapshot 5.
Select Snapshot 6, Hot Plexi. We’ll transform this into a big solo sound. Activate the first delay block, Adriatic Delay. This is a fine-sounding bucket-brigade delay effect, but it can be too muddy for a coherent solo. Click-hold these parameters and assign them to Snapshots via their pull-down menus: Note Sync, Feedback and Mix. Those three parameters now display the camera icon [Image 12].
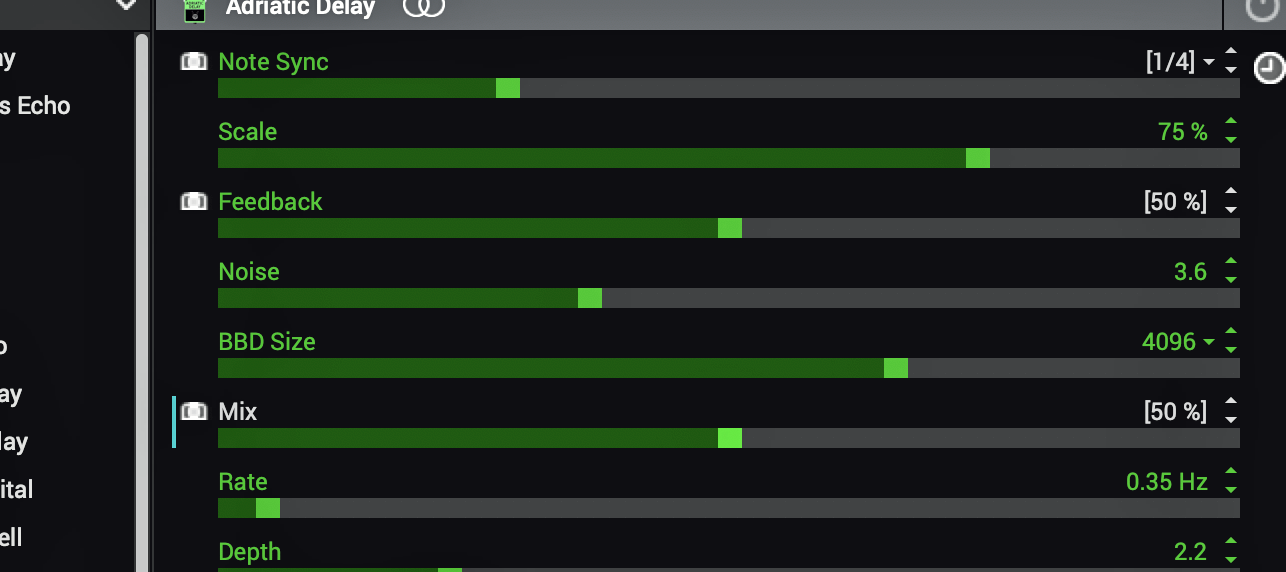
Slow the delay time from ¼ to ½ to mimic a large hall’s echo. Meanwhile, let’s clarify the sound by lowering Feedback to 15% and Mix to 30%. Rename the Snapshot as Hot Echo and press Save. Now we have a fat, wet solo sound, but not so wet that the dry signal gets lost [Audio 4].
Our snapshots have been fairly conventional so far, so let’s get freakier in the remaining two slots.
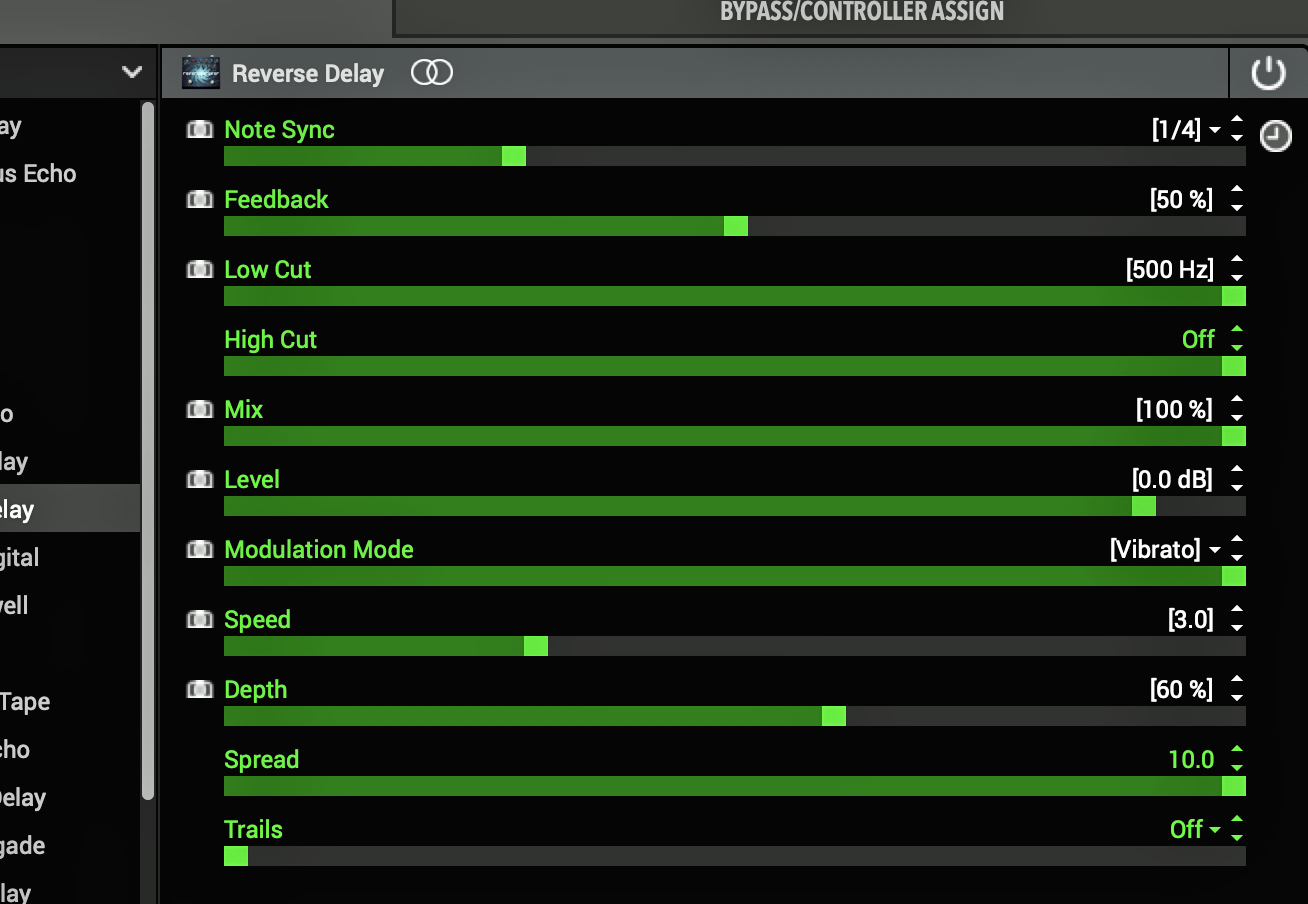
Select Snapshot 7. Let’s add reverse delay by activating the third block in the lower path. Assign the following parameters by click-holding on them on selecting the Snapshots option from the pull-down menu: Note Sync, Feedback, Low Cut, Mix, Level, Modulation Mode, Speed, and Depth [Image 13]. Your signal should sound like Audio 5.
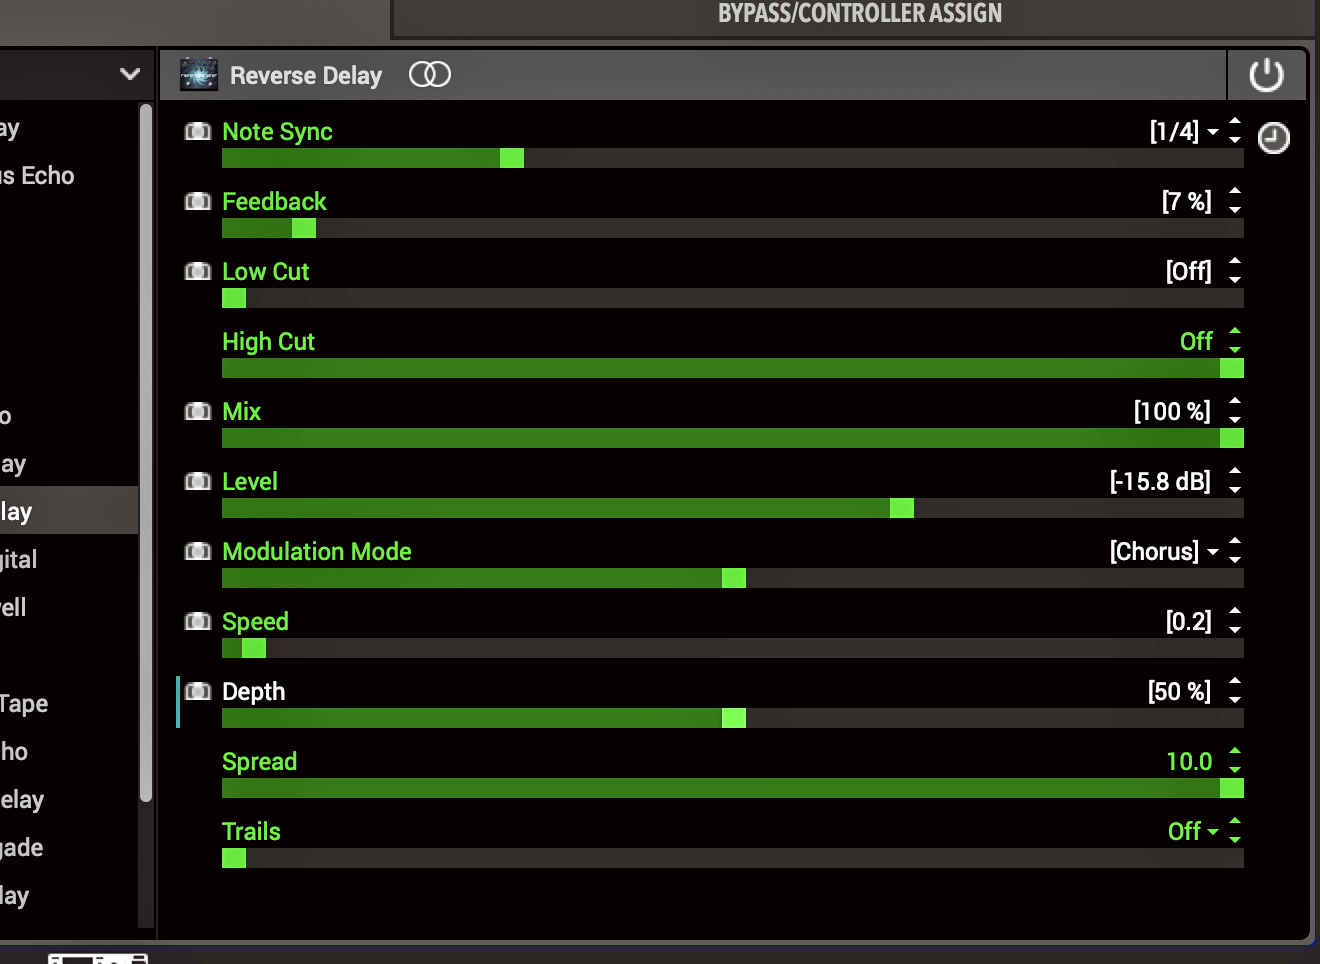
It’s a cool effect, but it’s a bit sloppy. We’ll mutate the delay effect while making its presence subtler. Lower Feedback from 50% to 15%. Advance Low Cut to its highest position, filtering lows from the echo effect. This makes the effect sit more comfortably behind the wet signal [Audio 6].
Let’s warp the delay signal with pitch modulation. Set Modulation Mode to Vibrato. Set Speed to 3.0 and Depth to 60%. Finally, lower Mix to 35% so the wobbly echoes don’t overpower the dry sound. Now we’ve got an odd, spacy sound that doesn’t obscure melodies and chord progressions. This tone might also benefit from a bit more compression. Open the last block in Path 2, LA Studio Comp. Click/hold the Peak Reduction slider to assign it to Snapshots. Raise the slider to its maximum position [Image 14].
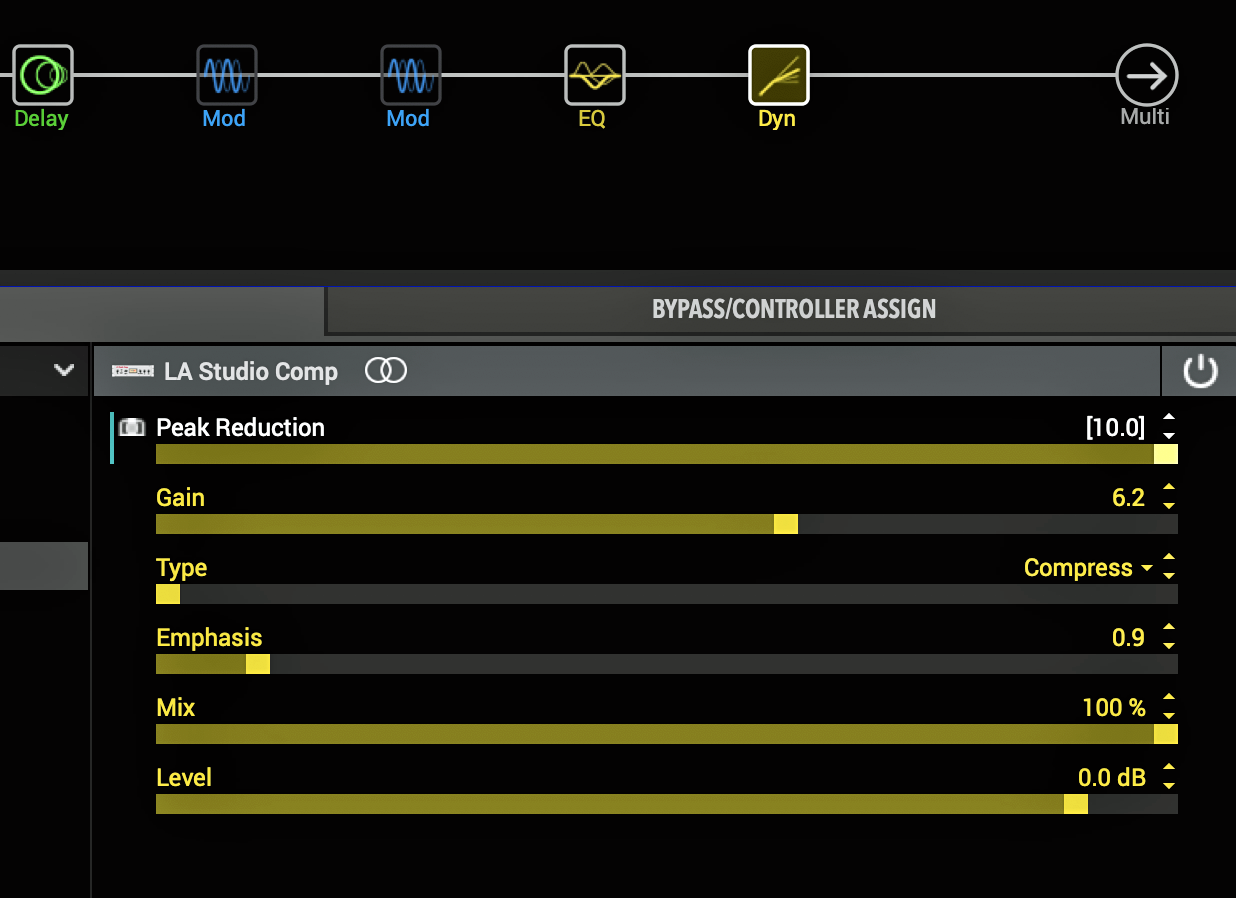
Your audio should sound like Audio 7. Rename the snapshot as “Warp Clean” and save.
Since we’ve already got three distorted sounds, let’s make Snapshot 8 weird as well. This powerful tone has walloping low end, but perhaps too many lows for a solo—it might clash with the bass and any other guitars. We’ll modify it with Helix’s bitchin’ new Tilt EQ block, which lets you adjust broad swaths of EQ via a single slider. It’s in the second-to-last slot in Path 2.
Select Snapshot 8. Assign Tilt EQ’s Tilt parameter to Snapshots. Raise the Tilt slider from default Flat position to Bright 25. This boosts high mids while siphoning off lows. The tone is less heavy, but likelier to work as a band solo sound.
Let’s get weirder with a pulsating reversed tape effect. Activate the second modulation block, Bubble Vibrato, which introduces a bold stereo effect. Switch on Reverse Delay, where we’ve previously assigned multiple parameters to Snapshots. Lower Feedback to 10% and raise Mix to 100%. Now we have a cool reverse sound, but it needs to be louder. Raise Reverse Delay’s Level control to 0% [Image 15]. Rename the snapshot as “Melt Back” and save.
It should sound something like Audio 8. Rename it “Melt Back” and save.
Now we’ve got eight high-contrast snapshots—more than enough for a song. If you didn’t follow all these moves, load the preset Snap Me 03, which includes all our work so far.
Part 3: Finishing Touches
Let’s make this board performance-ready using some non-snapshot techniques. It’s often effective to switch between Snapshot and Stomp views while performing within a single preset. That way, you have access to your eight pre-programed sounds, but you can also expand your tonal range by toggling to stomp mode and working the footswitches.
I won’t walk you through that process—this article is too long already! But the following set of assignments are one possibility:
Footswitch 2: Kinky Boost on/off
Footswitch 3: US Dbl Nrm on/off
Footswitch 4: Adriatic Delay on/off
Footswitch 5: Reverse Delay on/off
Footswitch 8: Compulsive Drive on/off
Footswitch 9: Brit Plexi Arm on/off
Footswitch 10: Harmonic Tremolo on/off
Footswitch 11: Bubble Vibrato on/off
Wait a sec! With each amp block assigned to a footswitch, that means you can have both amps on at once—or neither. Isn’t that weird?
Hell yeah—and it’s awesome! (Try it and see.) When creating analog-style sounds in Helix, it’s tempting to follow the exact signal flow of favorite analog guitar rigs. But digital is a different playing field. Breaking the conventional “rules” is one of the fastest ways to unlock cool new sounds.
More about Helix.
Joe Gore is a musician, writer, and tech geek from San Francisco. He’s recorded and performed with numerous renowned artists and written thousands of articles about music, musicians, and music tech for major publications. He also designs analog stompboxes and sound collections for Helix.
Related posts
Leave a Reply
You must be logged in to post a comment.


Hi Joe, This is really awesome post! I’d like to be able to do some of this, but I’m not seeing the new amps or cabs in my Hx Edit and/or Hx Effects? And when I tried to import your Snap Shots I get an error report? Hx Edit is at version 3.70 and Hx Effects is at 3.71.0. I’m using a Macbook Pro box with the latest OS update…
Any feedback very much welcomed!
Regards, j.t.
Hi j.t.
I’m sorry to see you are running into some trouble. I encourage you to reach our technical support staff at https://line6.com/company/contact/ via phone, email ticket, chat or text. They will troubleshoot your issue with you.
Thanks,
Angela